Monday, September 10, 2012

Fall Time Faux Caramel Apples

In the past I used to make these and sell them in my shoppes, however I use a more complicated method to make mine! I came across a very simple method on "The Pickled Pepper Patch" blog page and I wanted to share her post as this is a great and easy method for even the beginner!


These were featured in Create & Decorate 2010 Fall Issue:
Supplies needed:
-Stryrofoam Apples (bought mine at Dollar Tree)
-Decoupage Medium (Modge Podge)
-Craft Paint (any tan caramel color will work)
-Corn Cob Litter (Walmart in Small animal section)
-Popsicle sticks
-Disposable plastic cup
-Plastic Spoon
-Wax Paper
-Gloss Spray finish (Walmart Brand Clear Spray)

Directions:
1. Insert your popsicle sticks into the top of your Apples. If you'd like, you can pull out and add a dab glue.

2. Place your Apple onto a large piece of Wax Paper.

3. Mix approximately 1/2 the bottle of Mod Podge about 2-3 teaspoons of your craft paint. (If you want a darker color add a few squeezes more of a darker brown)

4. Stir with popsicle stick.
You can add more if it's not opaque enough. Or adjust the color to your preferance.

5. Now with your plastic spoon, spoon colored Mod Podge over your Apples. Let it drip down the sides like real Caramel would.

6. Repeat over all the Apples.
You can let some of the Apple peek through near the bottom, this just makes it look truer.

7. Sprinkle your Corn Cob litter on the top and lightly down the sides.

8. Place your Apples onto a new piece of Wax Paper to dry OVERNIGHT!

9. Once your Apples are completely dry, Spray them with your gloss clear sealer. This will give them that added shine they need to look like real Caramel Apples!

10. Now, display them all together sitting on plate...just be careful because someone IS going to try and take a bite of them! LOL


If you'd like to go a step further and package them up for gifts, etc.
You can place them into clear cellophane bags and tie them with raffia, ribbon, etc.


Happy Crafting and make sure you check out The Pickled Pepper Patches Blog for other great items!!

Printing on Muslin

This beautiful printed pillow is so EASY to make! For any who dosen't know about printing onto muslin this is how you do it. Iron butcher paper, the wax side down, onto your fabric; muslin is the common choice. Cut the size of your printer paper (typically 8.5 x 11) and then feed through the printer.

A few tips I've seen and have found when doing this, is you can not do this with a laser printer, only inkjet. A laser printer will actually burn the fabric. Second; you want to grubby or prim your fabric before printing on it. If you try to do this after, you will end up with ink running and not such a pretty picture.

This is a fantastic way to make your own feedsack pillows, and other endless possibilities. If you are in need of vintage photos, there are MANY free sites filled with beautiful vintage pictures.

Here are a few, and others may be found by searching Google and/or on Pintrest: http://freevintagedigistamps.blogspot.com http://afinefarmhouse.blogspot.com http://printable.tipjunkie.com/lunch-bag-favors-printables/

Check out directly from here. Fast. Secure. Simple.


CountryCraftsandCandie's Studio

Wednesday, August 22, 2012

How to turn handwritten recipes into tea towels

Emma Jeffery from the blog Hello Beautiful had this amazing project where she turned her grandmother's handwritten recipes into tea towels for her own kitchen. When I seen this I just had to share it! I can't wait to do this myself, only with a grungy more primitive look!!!


For a woman who keeps a newspaper from the day she was born, my mum has surprisingly few keepsakes or handwritten memorabilia from her own mother who passed away in 1999. When I asked her to trawl through her old papers and files, she managed to find three handwritten recipes from my grandmother. They appear to be the only remaining examples of her handwriting left in the world, and they are therefore as precious as they are priceless.


I decided to use these recipes to make a set of dish towels for my mum and I. This way, the handwritten originals can be safely stored away yet the joy of being able to see my grandmother’s handwriting in an everyday context will continue to make us smile and feel close to her. Spoonflower’s linen-cotton canvas is the perfect fabric for dish towels. Linen is known for it’s super absorbent qualities, and with a 54” wide printable area, they are perfectly sized to fit a set of four dish towels on to one yard.

I began by taking photos of each recipe page, saving them to my computer and opening them in Picasa. The originals were old and yellowing with discoloration in some areas, but by using some of Picasa’s edit tools -- specifically the ‘retouch’ option (to minimize some of the blotchy discoloration) -- I was able to get a cleaner appearance to each page. I then turned each recipe into a landscape orientation.


After selecting all three images (I only had three recipes, so two of my recipe dish towels are identical), I selected the ‘Picture Collage’ option under the ‘Create’ tab. Picasa automatically places the images into a collage arrangement, that you are able to edit and move as you please. I added a grid spacing in between each image so that I would have a convenient cutting line, and by making the grid lines a color, I had an eye-catching feature for the back, hemmed edge of the finished dish towels.


Under the ‘Page Format’ option, I set the size of the collage to 54” x 36”, which will fit exactly on to one yard of the linen-cotton canvas and uploaded the design to Spoonflower. I always recommend ordering test swatches before committing to ordering the actual yardage, that way you are able to make color and size adjustments without spending a lot of money. The dish towels were simple to sew up. I cut them out along the grid lines and turned back the hem. I also sewed a small length of twill in one top corner of each dish towel for convenience.


The linen-cotton canvas is a beautiful fabric and will only improve with extensive washing and use. The really nice thing about these is that if they ever do suffer from wear and tear I can simply have more printed, without even having to dig the original paper copies out from storage.

Dry Erase Calendar Wall Art

So how easy was this project? Very. I used a tightly woven burlap. The writing and grid were done with a Sharpie and the monogram was cut from fabric and fused in place. I used a Sharpie instead of a dry erase pen to add the month and days. I just liked it better. That's it.
This great project was brought to you by Cottage Hill :)

Why Baby Basics are the Best Baby Shower Gift

“Katie Moore has written and submitted this article. Katie is an active blogger who discusses the topics of, motherhood, children, fitness, health and all other things Mommy. She enjoys writing, blogging, and meeting new people! To connect with Katie contact her via her blog, Moore From Katie or her twitter, @moorekm26.” When it comes to baby showers, many of us dread the same old silly games and dislike the thought of giving yet another predictable baby shower gift even more. After all, there are just so many “It’s a Girl!” or “It’s a Boy!” signs, balloons of gifts that you can give out.
Instead, think about giving the new mom a unique baby shower gift filled with items that she will actually use and need when that baby comes, especially if this is her first baby. More than one new mom finds herself with great big expensive gifts like strollers and fancy highchairs that won’t be useful for months but without wipes or baby wash when the baby comes home.
Baby Basket Start with a good, sturdy new laundry basket if you are on a budget or a lined Moses basket if you have a little more money to spend. There will be plenty of laundry with a new baby and a Moses basket is helpful to move the baby around when she or he is still tiny. In other words, you want to have something that you can fill with other baby items but is also something useful for Mom.
Diapers Next, get some newborn diapers. Many new moms do not have enough diapers and they can be expensive, so the new mom will be grateful to get them as a gift. Remember, however, that not all babies are newborn size (up to 7 pounds) when born, so choose diapers that start at 8 pounds. Do not worry if baby really is petite, he or she will be growing quickly and will fit those diapers in no time.
Wipes Just like diapers, babies will fly through packs of wipes. So get a pack of baby wipes for your gift basket as well, but look for the ones that Mom will want for that delicate little tush, such as chlorine-free with no dyes, fragrances or alcohol.
Baby Wash Baby will need some bathing and once again, this is an amazingly ordinary product that many new moms forget to buy until the little one is already home. Again, you can make it more special by buying something delicious like an organic baby wash instead of just the generic store brand.
Onesies Experienced moms will tell you that you will never have enough onesies, especially in the beginning when spit-ups and diaper accidents are common. Therefore, stock up on onesies that range from basic white to fun and silly so that Mom always has an extra one (or five) on hand.
Mama Spa Okay, now that you have the baby basics included, put in a few things for Mom. Once that baby comes, leisurely baths and professional pedicures will be a thing of the past, at least temporarily. So find some delicious, gentle products that will allow her to do a little pampering at home, like some lovely, nourishing shampoo and conditioner. New moms often losing a lot of hair right after delivery, so some good hair products are always a good thing. If Mom is planning on nursing, you might also want to find some organic, unscented lotion because some babies object to strong scents. What Mommy Really Wants Before you finish your gift basket, check to see if the new mom has registered for products and add a few basics from the list. People often buy the big-ticket items for a baby shower, leaving the basics like pacifiers and baby bottles out of the loop. If you cannot find a registry but think one must exist, ask around. The new mom’s mother might know, as might close friends or co-workers. Some mothers may have also planned for an alternative type of shower or registry, such as an umbilical cord blood banking registry or registered for donations and gifts to be given to charity. So there you have it, a unique baby shower gift that is actually useful and will make both Mom and baby happy!

Thursday, March 29, 2012

Malley's Chocolate Fundraiser for Angels Haven Horse Rescue

Hey everyone, back in Ohio my mother works very closely with a horse rescue and I try to help when possible with my business. Unfortunately Ohio laws do not protect horses as they view them as livestock. So therefor whenever they need to r...escue these poor animals they have to actually purchase them from the abuser in order to remove from their awful surroundings.

With the Easter holiday around the corner and many buying candy, I thought I would throw their fundraiser link out there as any help they receive helps these amazing and beautiful creatures. They have a Chocolate/Candy fundraiser via Malley's Chocolates at: http://www.malleys.com/angels-haven-horse-rescue and you can learn more about the rescue and see pictures of all the horses they have and will continue to help at: www.angelshavenhorserescue.org
If Chocolate is not your thing, you can find other ways to help via their website including their own special brews of coffee you may purchase that also helps benefits these beautiful animals. Thank you all for taking the time to read this post as it is brought to you with good intentions and not as a solicitation.

Friday, March 9, 2012

New Items in our Shoppe.......

I am excited to announce that we have added lots of new items to our shoppe! Items include New container candles and styles, coffee and drink candles, blackened beeswax, tealight/ flicker candles, ice cream candles, seasonal candles, triffle candles, pie and cobbler candles, and new Primitive Stitches items!

Make sure to check out our New Shoppe on Artfire........


Friday, February 24, 2012

Adorable Little Shoo-Fly Screen

So I came across this amazing tutoral and just had to share. This simple and amazing idea is from Pamela of Our Pioneer Homestead.

"So I have seen here- and- there, people with these litttle mini shoo-fly screens. They are too cute!!! Great for a shelf or cubby!!

-So I started out with a strainer. First, carefully, using a dull butterknife, (always work AWAY from yourself- your body, face, or other hand) I loosened the metal "track" beside the 2 hooks on the strainer. Just a bit.
-Then I forced them up and pried them out with the butterknife.
-Then, for the handle, the handle is in the track about 1/2 way around the diameter, so I loosened the metal track by sliding the dull knife in, and then sliding it along, prying slightly as I went. Once I removed 1 side of the metal handle, I could just pull out the other side.
-Using plyers and a tea towel, protect the track with the towel and press it closed with the pliers.(so not to have big marks.)

Now it is best to spray with metal primer. However, this is a little one is for me, not to sell, so I didn't prime.
-Using a stiff small brush (with tough bristles) using a SMALL amount of paint, stipple the color on. Some people use spray paint, but I find I was getting to many "squares" or"filled in mesh holes".
-If you are getting "squares" (filled in mesh holes) with this method, , use less paint, stipple and disperse until they dissapear, or use a stiffer brush. This is how I do it, but I am no expert. This is what I prefer.

Here it is done! I topped it off with a little antique handle! Once you make one of these little cuties, you will want them in every nook and cranny!"

Now why did I not think of this amazing idea? I am always looking at the antique ones which are insanely expensive! Great Idea Pamela!!

10 Minute Prim Curtain Project


What you'll need: a piece of fabric slightly larger than the window sills.(By a few inches), matching thread and a sewing machine, twine, 2 tacks, the existing curtain rod, an iron.

This one was made out of a nice piece of osnaburg (could also use grubby muslin or cheesecloth). First sew a rod pocket, and quickly hem the sides. If the bottom is the factory edge, you don't to sew it.

Hang the curtain and move any gather to the edges of the window, leaving the middle taunt. Take 2 pieces of twine and gather the fabric upwards. For the correct hanging, usually place twine 1/4 of the way in the window. Try not to fuss with the gather. Loop it up and leave the folds hang as they will. If you fuss with the pleats after tying, you might need to let the fabric fall again, and gather it up again. Tie with a bow. Now the sides of the curtain will be gathering towards the inside of the window. So, using a tack, find where you can attach the cutain to the sides of the sill so that it doesn't look "pulled". ( slightly lower than your center twine pulls; at about a 45 degree angle from them) This will make the curtain nice and straight, and following the sill on the sides.To high or too low, to far in, and it won't look natural. Place tacks on inside so they don't show.

This idea is brought to you by Pamela of Our Pioneer Homestead.

Extreme Prim Corn Cobs


-I use the stem end for the face, as it is the widest. Remove the stem. Paint the dried cobs with black acrylic craft paint. Stand them up in a glass to dry. After, soak glasses in warm soapy water.

-Once dry, coat them with a thin coat of modge podge. You may also use white glue I suppose, if that is what you have on hand. I used modge podge. Get into the cracks of kernels.

- Dash on spice mixture with a brush; I used cinnamon, but you may use cinnamon and cloves, pie spices, ..etc. Let some black show through~

-For dress, fold a piece of fabric in half, and sew up the side. Allow for a width of 3-4x the width of corn doll.

-Gather fabric around the neck of corn doll, and tie tightly with raffia.

-Place coffee grunged of fabric over top to along the sides of the head, and tie with raffia once again, for the make-do bonnet. I like to leave the raffia long.

-They look cute in an olde mercantile crate!

****Alternative:You may also use this method for display cobs. (without the "doll look") Paint and spice as directed, and gather them in a trencher, for an extreme prim gathering.

This tutorial/pattern is brought to you by Pamela of Our Pioneer Homestead and is not intended for resale.

Friday, February 17, 2012

Primitive Snowman Tutorial


I know it's Feb, however who doesn't Love snowman? This is an adorable creation from the "Old Cupboard Door", that I just had to share this. This has to be one of the cutest snowman creations I have seen in some time.

So let's get started:

Supplies List:
4" styrofoam ball.
Joint compound ( you can find a small pre-mixed container of this at Wal-Mart)
Old tube sock
Moss
Small rusty bell
Medium rusty bell ( the size bells you use is your choice)
Winter red berries
Photo mount spray adhesive
Hot glue
Americana acrylic paints ( Buttermilk, lamp Black, Soft White, Russet, Burnt Orange, Burnt Umber, White, Hertiage Brick Red.
Brushes (sizes: large flat brush, small round, liner and round stencil or scruffy brush)
Homespun fabric
Dowel (the size will depend on the hole size in your mill spool or whatever item you use as the base)

I have used a 7 inch old mill spool for this project but don't limit yourself to only this. You can also use a chair leg (like I did for Jacz), spindle, a candle stick (like the big-headed snowman), there are many possibilities so if you can't find a mill spool consider one of these options.


Insert a small wooden dowel rod or wooden skewer into the styrofoam ball (this is used only to hold it while it dries). With a spatula add the joint compound to the Styrofoam ball. Don’t make it too thick or it will take forever to dry but don’t make it so thin you can see the stryofoam. Allow to dry about 30 minutes and then smooth it out by dipping your finger in a cup of water and tapping the mud with your wet finger. Tap and then smooth, tap and smooth. Keep your finger wet so the compound doesn’t stick to your finger Don’t worry if it isn’t completely smooth, mine never are. Now allow the compound to dry for 18-24 hours.

Once the head is dried, basecoat it with Buttermilk. When the paint is dry, draw on the nose, eyes and mouth. Now, dry brush the cheeks with Russet. Make sure you remove most of the paint from the brush so the color is not to heavy. Paint the nose with Burnt orange. shade with Russet. Shade around the nose with Burnt Umber. Add white hatch marks to the nose. Dot the eyes with Lamp Black. Dot the mouth with Lamp Black; use a smaller dot of white to high light the mouth. Water down some Burnt Umber and shade around the eyes and mouth. Paint the snowflakes with White and dot the ends and center with White.

I am not stating the size of the dowel that is used for the neck because the mill spool you use may be a different size than what I have used. Or, if you are using something other than a mill spool you may or may not need a dowel rod. If you are using a dowel rod, cut it into a 5" length. I could not find a dowel rod that fit perfectly, I had to sand down the end so it would fit. No problem there since it won't be showing anyway. Base coat the dowel with Buttermilk. After it has dried add the stripes using Heritage Brick. You can give it a primitive look with some stain.

Add some wood glue to the end of the rod and insert into the mill spool. Lightly hammer the rod into the spool. Be care because the spool might split.

Now comes the fun part. Push the remaining end into the styrofoam ball. Make sure you push it at least 2-3 inches into the ball and that the head is not tilted down. Now, pull it out and add hot glue into the ball. Be somewhat generous with the hot glue. You want to make sure the head is secure. Push the dowel back into the ball and hold it steady until the glue dries. Awww, it already looks cute!

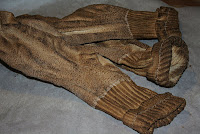
Ready for the hat? This part you might want to do while the joint compound is drying on the head. I use a coffee stain with Elmers glue in it which makes the fabric stiff. Add the sock into this mixture, wring out the excess stain. Bake it in the oven on a low temperture (around 225 degrees) checking it frequently so it doesn't burn. Beware, it will burn if it gets to hot and may even catch on fire, please, please, pleeeeze, check it often. I don't dry mine all the way in the oven since I make these while the head is drying; I turn the oven off and let the sock continue to dry on it's own.

Once the sock is dried. Pull it onto the head and position it how you want it to look, then hot glue it into place. I also position the top part and hot glue it into place. Using a small strip of homespun, tie the medium sized jingle bell on the end of the sock. Using hot glue add some moss to the top of the sock hat; then add a small jingle bell, some red Christmas berries and a couple of cardstock snowflakes. Add a piece of homespun around the neck. With a piece of rusty wire, I add the homemade cinnamon salt dough snowflake. You can find this recipe by googling for it. There are a lot of recipes out there for these type of ornaments. Followig the directions of the spray adhesive, spray the piece and quickly add the glass glitter. For the tag, I use a computer font and print it onto a ecru colored cardstock. Cut it out and use a hole punch at the top. To reinforce the hole I add a piece of masking tape. Rather than stain, I use brown shoe polish in the cake (or solid) form to antique the tag; it gives it a waxy look which I like. Tie the tag around the neck using a piece of homespun.

There! Your done. Aren't they cute? I hope you enjoy making this (these) snowfellas as much as I did.

For other great ideas from Willa at the Old Cupboard Door, Visit her blog at:
http://www.theoldcupboarddoorblog.com

Mason and Glass Containers


Looking for a cute way to change up your old glass jars, mason jars, vases, or even canvas? Look no further! This such a simple idea that leaves possibilities endless.

Using a glue gun, write words or make designs on your glass container or canvas. Once dried, simply paint with craft paint. You can leave a solid color, you can grungy, the possibilities are endless. Simply apply a top clear coat to protect, dress with raffia, pip berries, sweet annie, or whatever you can think of and you have one amazing new display item!

Wednesday, February 1, 2012

Changes to our Product Line......

I want to let you all know of what I feel is exciting news!! Because of the high demand and candle orders, we are in the process of making changes to our product line.

In the upcoming weeks we will be adding our primitive and grubby candles back into our product line,Blackened Beeswax candles, as well as still offering our current candles you have all grown to love. We will also be expanding by offering many of our candles with a wickless battery operated tea light option, so you can still enjoy the same beautiful creations without having to burn them!

With the decision to increase our candle product line, we will be no longer offering our full faux bakery line and bath and body/ soap lines. This was a difficult decision to make, but one we made based on time and being able to provide quicker turn around for shipping. The last four months of last year really made me realize I am only 1 person and can not spread myself so thin!

I have decided however to continue to offer these items during the holidays as limited edition items in the bath and body and faux bakery/ ornaments line. We will also during the holiday seasons be offering special gift basket/ boxes that will only be available during these times.

As always we know that this will be heart breaking as many have become addicted to these products and swear by the product. This is something that means a lot to us, and made this decision very difficult. So please know you me ALWAYS contact me to see if a custom purchase would be possible in the off season.

Thank you so much for your continued support, and passion for our products! I look forward to bringing you LOTS of great new items in the weeks to come!

Wendy

http://www.artfire.com/ext/shop/studio/CountryCraftsandCandies

Thursday, January 26, 2012

Shop with us on ARTFIRE

Over the past year, Etsy has made many changes including the quality of their site. We have paid hundreds in fees each month and just can not continue. In order to bring the same quality product and affordable prices to you, we have moved our shop to ARTFIRE: http://www.artfire.com/ext/shop/studio/CountryCraftsandCandiesOf course you can still find us at www.countrycraftsncandies.com as well.


Please make sure to bookmark our site! We look forward to a Happy 2012 with you!
Wendy